


Non-Fungible Tokens
Introduction#
Non-fungible tokens, or NFT, are digital assets that are provably unique. They can be used to represent both tangible and intangible items. Each NFT Token contains identifying information recorded in smart contracts. It’s precisely this information that makes a token - non-fungible and as such, they cannot be directly replaced by another token.
ERC-721 (NFT) Smart Contracts#
This tutorial guides you through a basic ERC-721 (NFT) smart contract on Dijets Test Network. We'll deploy our NFT on the test networks utility chain and view it on the explorer. These NFTs aren't transferable to Dijets Mainnet. However, once you feel comfortable launching your NFT project, you can do so on Dijets Mainnet and list it on an NFT marketplace.
Note that the following tools will be used during this tutorial. It is thus presumed that you chave access to each one of them.
- Pinata: To store your NFT images and metadata.
- OpenZeppelin’s Wizard: to create the ERC-721 smart contract.
- Tinker IDE: To edit the code and deploy it to Dijets TestNet.
- Dijets Testnet Faucet: To fund the deployment.
- MetaMask: To process transactions related to funding and deploying the smart contract.
- Dijets Utility Chain Explorer: To view the deployed smart contract.
caution
This Solidity smart contract tutorial is for demonstration purposes only. Users should consider proper precautions, error handling, and safeguards for production use. No one at Dijets is responsible for your development, and you must take full responsibility for ensuring your code is secure.
Preparing Your NFT Files#
The first step of setting up an NFT smart contract is having your NFT files ready to use. In this example, the files will get uploaded to Pinata, a pinning service that prevents files from being garbage collected on IPFS.
If you're unfamiliar with the process of uploading image and metadata files to an IPFS provider for NFT collection usage, please have a read through this guide on preparing NFT files. Ensure that your files are uploaded and your base URI is ready to plug into your smart contract.
Once the image and metadata files are ready, we can prepare to deploy a smart contract.
Preparing Your Environment#
MetaMask Extension#
You'll need the MetaMask Extension installed on whatever browser you're using to be able to fund the deployment of the smart contract. If you've not done so already, download MetaMask and add Dijets Network to MetaMask. Create or import Dijets account as necessary.
Getting Testnet Funds#
Because we're deploying on the Dijets TestNet, you'll need to get DJTX on Dijets Testnet. Please visit Dijets Faucet, where you can request up to 2 DJTX per day for testing. These DJTX tokens have no monetary value and are only for development purposes only. Enter your Utility Chain address of the account linked to your MetaMask in the previous step to get the testnet DJTX.
Creating the Smart Contract#
To create the smart contract, we're going to use Open Zeppelin. Open Zeppelin is a key tool for building smart contracts quickly and easily. While we're only scratching the surface in this tutorial, OpenZeppelin has amazing documentation available on their website for you to read when you want to build more complex contracts.
Open Zeppelin provides a Contract Wizard that can help with building out ERC contracts. In the interest of keeping this tutorial beginner-friendly, we'll use the contract wizard to create our ERC-721 contract.
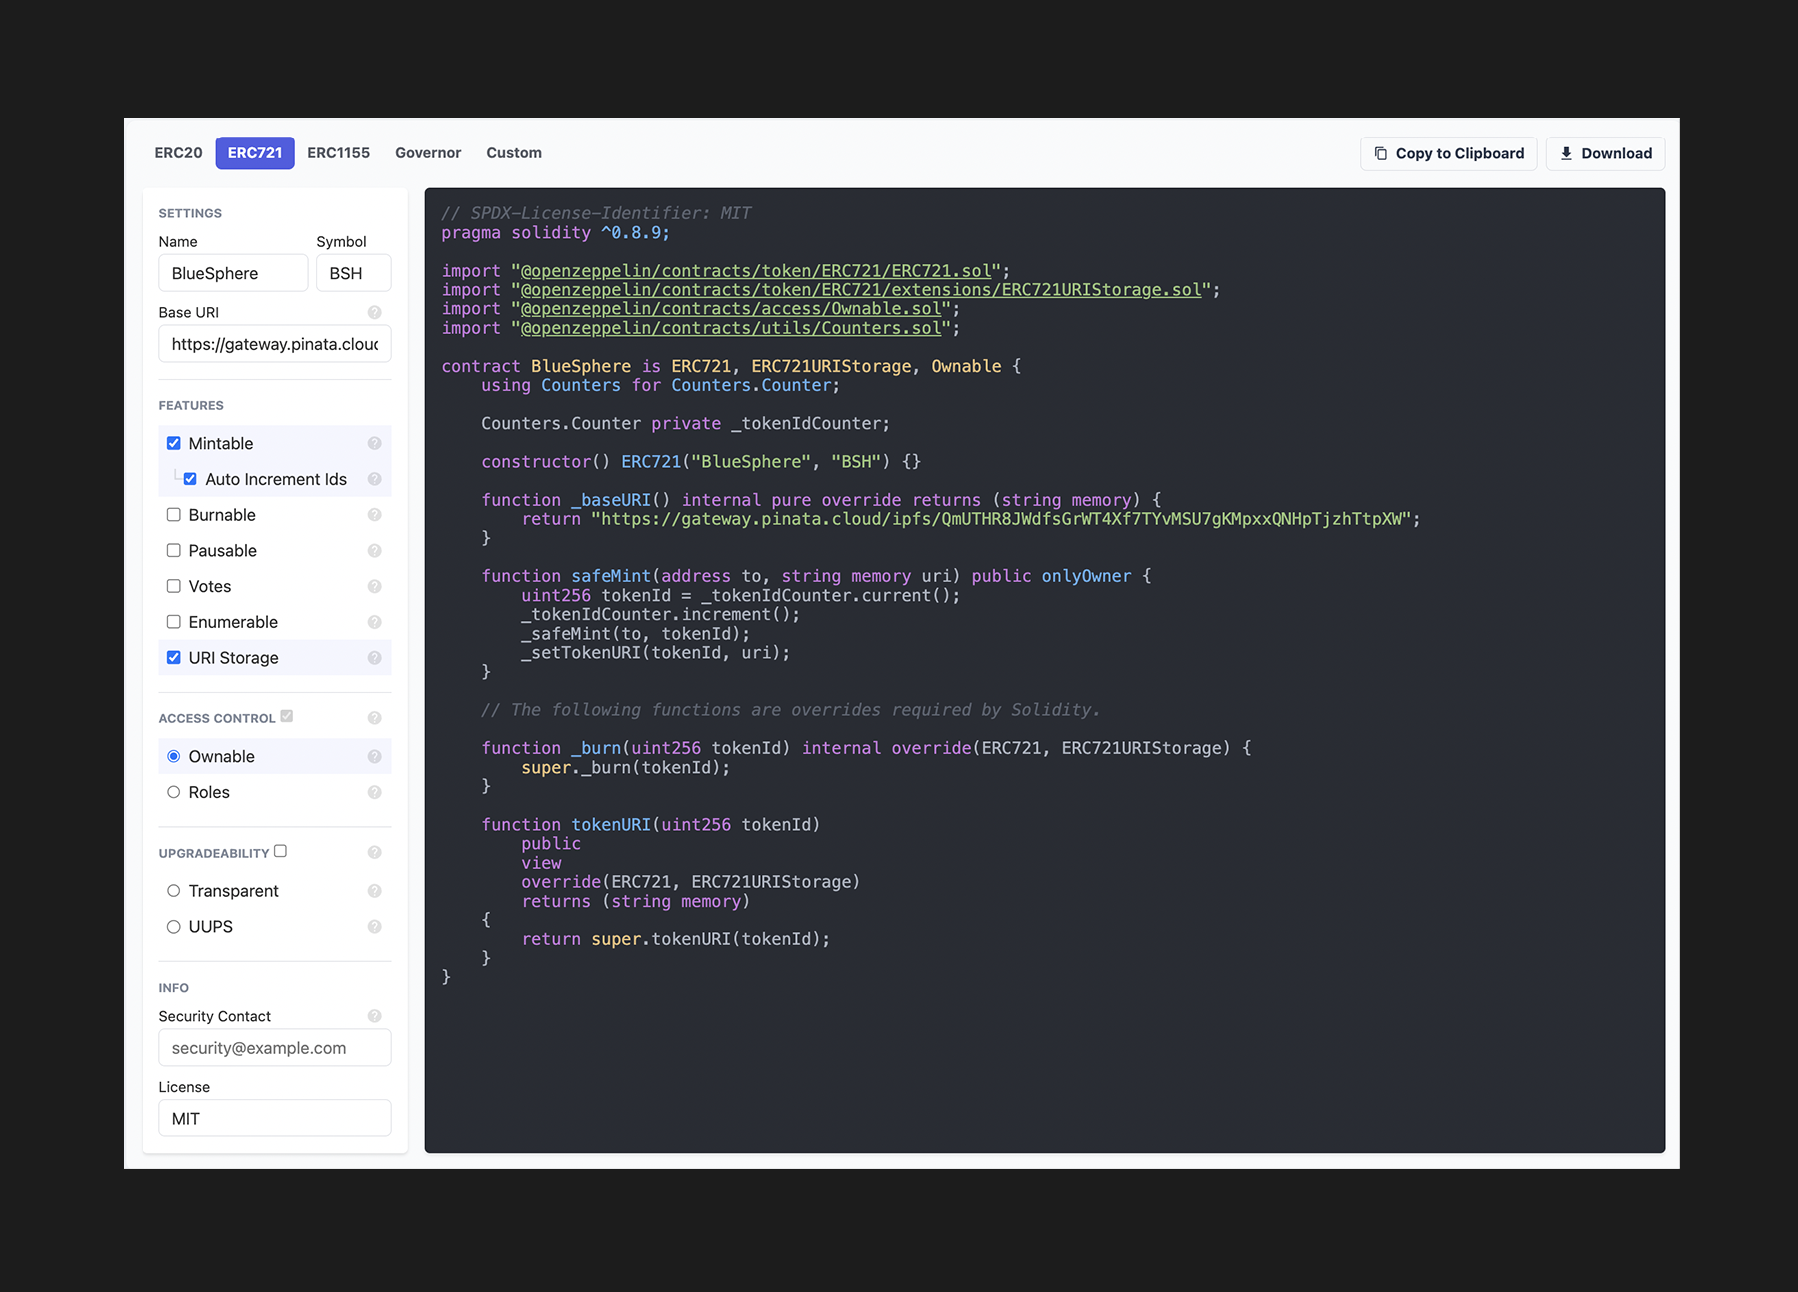
Select ERC-721 on the Contract Wizard to get started. This will create the
contract in Solidity programming
language.
As you can see, the template contract is bare-boned. We'll fill out the information in the left panel to auto-populate it into our contract. Make sure you change to the ERC-721 tab as you get started to make the proper contract.
The Wizard auto-fills in a name and symbol for your NFT collection, which we'll
modify here. I'm naming it Photography and giving it the symbol FOTO. If you
chose your own files to use during this tutorial, you can choose a relevant name
and symbol for your collection.
The Base URI field listed here is the URL of the metadata folder uploaded to
Pinata(for example, using the same URL as the one we generated in the tutorial for preparing the NFT files
https://gateway.pinata.cloud/ipfs/QmUTHR8JWdfsGrWT4Xf7TYvMSU7gKMpxxQNHpTjzhTtpXW).
Paste the URL into the Base URI field.
Next, we'll want to check the Mintable and Auto Increment Ids boxes. This
will populate a mint function into our template that would handle the
incrementing of token Ids on mint if we had more than one NFT in our
collection. We still want it to auto-assign our 1 NFT, so we'll check it.
This automatically checks the Ownable button, which gives the safeMint
function the onlyOwner modifier. This modifier indicates that only the owner
of the smart contract will be able to successfully call the function.
info
The onlyOwner modifier should be removed when creating a smart contract for a
public mint. Otherwise, users wouldn't be able to successfully mint the NFTs
when calling the safeMint function. Because this tutorial only handles the owner’s
wallet address, the modifier is being left in.
This safeMint function also doubles as an airdrop function in our contract because the
address the NFT is minted to does not need to be the function owner. This
functionality is specially useful when NFT collection owners want to give away
NFTs for free outside of the normal minting window.
You can download or copy the smart contract code and paste it in the Tinker IDE to start the deployment process.
Deploying the Smart Contract with Tinker IDE#
Tinker IDE is a fork of Remix that allows you to edit, compile, and deploy your smart contracts to Dijets Utility Chain by default. This will prevent you from needing to download any other coding environments or having to change networks and keeps the deployment process pretty straight forward.
After pasting in or importing the smart contract code into Tinker IDE, the first thing you need to do is compile
it. Hit the Compile button on the left-hand side. You could also use the
keyboard shortcut Ctrl / Command + S.
Once completed, you'll see a green checkmark on the far left tab. Next, you'll click on the bottom tab on the left-hand side to move to the deployment page.
Since we will be using Metamask to sign and confirm the deploymeny transaction, Click on the Environment drop-down, and select Injected web3.
This should prompt you to connect with your MetaMask account. Once connected, you can verify the correct connection by checking that the Account number matches your MetaMask address.
Now click on the Contract drop-down and select the contract you created and
compiled. It should show up with the name you gave it in the Open Zeppelin
Wizard. For our tutorial we used the name BlueSphere
Click Deploy. This will open MetaMask and ask you to confirm the transaction. Click Confirm.
It may take a second, but once completed, your newly deployed contract will
appear underneath the Transactions Recorded field.
Copy your contract’s address and open the Dijets Utility Chain Explorer.
Paste your contract address in the search bar, and click Search.
The first transaction you see should be the contract deployment you just did in the Tinker IDE.
Minting an NFT#
Now that we have deployed the contract, we can mint the NFT. Go back to the Tinker IDE tab and click on your contract to expand its information. A list of functions will appear underneath each stating the function you can use to interact with the deployed contract.
The only function we are interested in at the moment is the safeMint function. Click the
drop-down arrow for the function to expand the address field.
Copy your MetaMask address and paste it into this address field. This will
send the NFT to your address when the mint function has been called. Go ahead and Click
transact.
This will reopen MetaMask and ask you to verify the transaction. Click Confirm to mint your NFT.
Once the transaction has been confirmed, you'll see a green checkmark in the terminal at the bottom of the Tinker IDE.
Head back to the Dijets Utility Chain Explorer page for your contract and refresh
it. You should now see a second transaction, your call to safeMint.
By clicking on the transaction hash you can see that your NFT was created!
